In a burgeoning world of home entertainment upgrades, an astonishing 75% of homeowners now see a bespoke media wall as a quintessential element to meld cutting-edge technology with interior design panache. I am part of the editorial team here at CSAC.org.uk, dedicated to adding a dash of eloquence to the way you envisage and execute your home improvements. Through our comprehensive DIY media wall guide, you’ll transform your living space with an enhancement that’s not merely about aesthetics—it’s about tailored sophistication and streamlined functionality.
Imagine conceiving a self-made media centre that conceivably pushes the costs down from the average outlay of £2,000 – £4,000, embedding your personal style into every inch. The media wall isn’t just any section of your home; it’s the point where comfort collides with finesse, where evenings are spent immersed in cinematic bliss, and where cluttered cables become a thing of the past. With this guide, realise a central entertainment hub that harmonises flawlessly with your domestic bliss.
Given the popularity of the main living room wall as the go-to locale for these entertainment havens, our guide focuses on crucial nuances such as selecting a fitting place that balances spaciousness with practicality. Embrace the craftsmanship involved in elevating a mundane wall into a captivating feature that incorporates your TV, perhaps an Ezee Glow Celestial electric fireplace, and an orchestrated array of mood lighting—all while prioritising cable management. Prepare to embark on a project that over 80% of DIY enthusiasts find rewardingly tangible. Allow us to illuminate the pathway with our expertise and passion, ensuring that your ambition for a seamless media wall comes to fruition.
Join us as we delve into the intricacies from the necessary tools and materials, operational electric fireplaces with their enchanting flame effects and whisper-quiet operation, to the final stroke of Sherwin Williams Pure White paint on your custom-designed construct. Whether you’re selecting MDF boards or embedding sockets for a polished finish, we are here to ensure that your home media wall stands as a testament to both your vision and our shared expertise in living space enhancement.
Understanding the Media Wall Concept
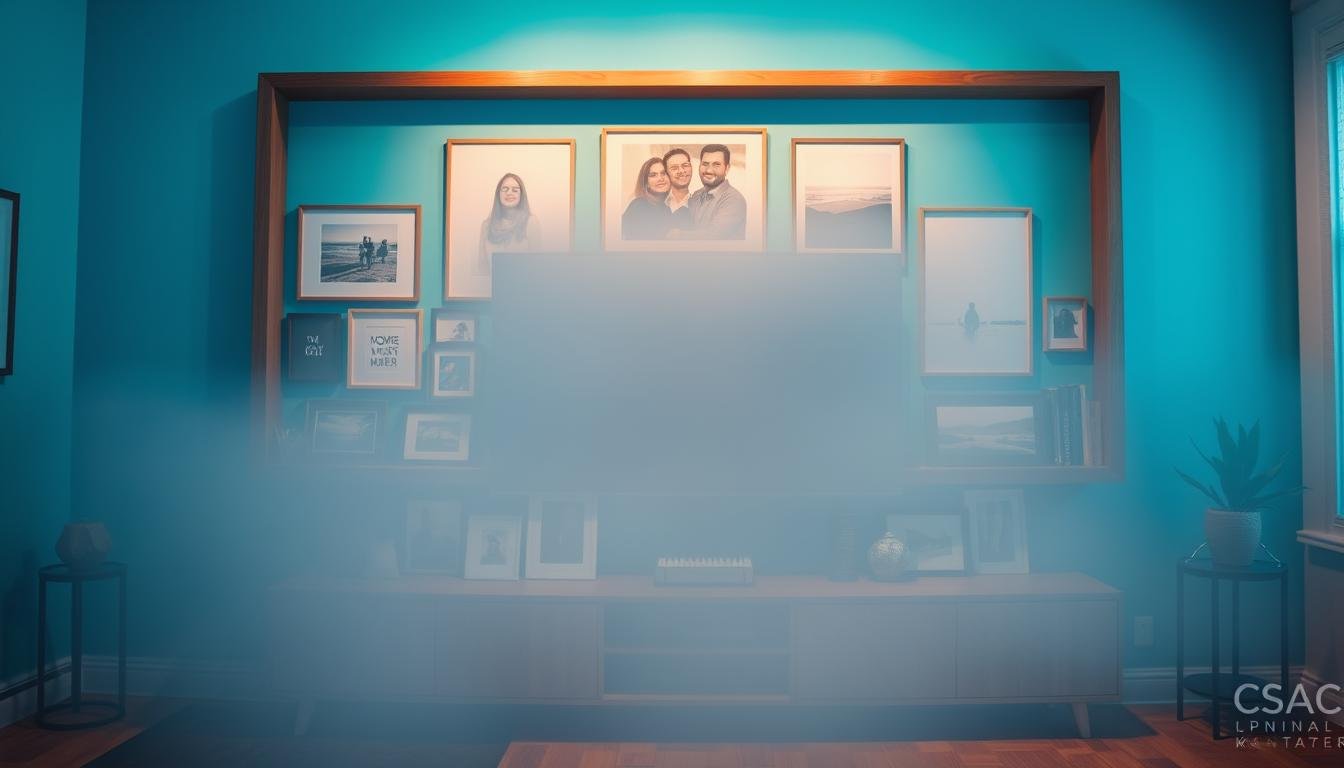
Constructing a DIY media wall transforms a plain wall into a stylish living room focal point that not only elevates your space aesthetically but also serves as a multifunctional, centralised entertainment hub. This project allows homeowners to integrate both technology and design, making it possible to enjoy a cinema-like experience in the comfort of your home.
What Is a DIY Media Wall?
A DIY media wall is essentially a custom-built structure meant to house various forms of media equipment and accessories. The foundation typically involves a sturdy, well-constructed frame which can incorporate many elements such as flat-screen TVs, sound systems, and digital consoles. Media wall components are strategically designed to conceal wiring and provide seamless access to entertainment devices, which results in a clean and orderly appearance.

The Benefits of Having a Media Wall at Home
The installation of a media wall comes with multiple media wall advantages. It is more than just an element of decor; it enhances the functionality of living space, allowing for a better organised and more visually appealing entertainment area. Homeowners appreciate media walls for their ability to consolidate entertainment systems into one area, minimising clutter and maximising space utilisation.
Furthermore, a media wall can significantly increase the value of a property. Prospective buyers find these installations attractive because they blend modern technology with home aesthetics, offering a ready-to-use stylish living room focal point that appeals to a wide audience. With possibilities ranging from a simple display shelf to an elaborate multimedia suite, media walls can be tailored to fit any room size or style preference.
Incorporating a media wall into your home not only caters to functional needs but also enhances day-to-day living by creating a more enjoyable and user-friendly environment. From gathering with family for a movie night to enjoying video games with friends, a media wall makes every occasion more special and convenient.
Planning Your DIY Media Wall Project
When embarking on a DIY media wall project, a tailored approach to design planning and clear media wall objectives are essential. Start by focusing on what you hope to achieve through your media wall, be it enhancing your home entertainment system, incorporating additional storage, or a combination of both. The function of your media wall significantly influences both the design and the technical aspects of construction, such as entertainment system integration.
Choosing the optimal location for your media wall involves meticulous space allocation. Consider factors like the size of your TV, the necessary mounting height, and space for additional functionalities like shelving or audio equipment. An effectively chosen location provides not just convenience but also improves the viewing experience.
It is crucial to evaluate the available space meticulously to ensure it accommodates your vision. Measure the area to accommodate all your needs without overcrowding. Remember to consider light reflections, which can affect viewing quality, and ensure there is sufficient proximity to power supplies for all your equipment.

Below is a detailed comparison of choosing DIY versus professional installation for your media wall, highlighting the importance of careful planning and budget considerations:
| Aspect | DIY Installation | Professional Installation |
|---|---|---|
| Cost | £2,000 – £4,000 | Increased due to labour fees |
| Time | Varies, extensive for novices | Generally faster |
| Finish | Depends on skill level | Polished, high quality |
| Tools and Materials | £1,000 – £1,500 for flat pack options | Provided by professionals |
| Potential Issues | Cable management, stability | Cost-related adjustments |
Understanding these factors can significantly impact your decision-making process, reinforce your design planning, and ensure a smooth integration of your desired entertainment systems into the DIY media wall. This approach reduces the likelihood of costly mistakes and enhances the overall success of the project.
Designing Your DIY Media Wall
Embarking on a DIY media wall project involves intricate planning and design, ensuring that every element from material selection to technology integration, harmonizes with the overarching DIY media wall aesthetics. Central to this process is choosing a coherent theme and the materials that will frame your visual and functional masterpiece.
Selecting a Theme and Materials
When considering the media wall design, the initial step is to decide on a theme that reflects your personal style and the décor of your home. Whether it’s industrial chic with exposed metal and reclaimed wood, or a minimalist look with sleek, monochrome schemes, the theme will dictate the subsequent material selection. Understanding the different material attributes is essential — for instance, using MDF (Medium-density fibreboard) ensures a denser and smoother finish compared to regular wood, while incorporating elements like Trepanel® wall panels can enhance the texture with their distinct natural grain.
The choice of materials not only impacts the appearance but also the overall functionality of the media wall. For example, incorporating thick batt and foam board insulation within the wall can proficiently minimize noise transfer to adjacent rooms, a perfect addition if your media wall backs onto a quieter space like a bedroom.

Integrating Technology Seamlessly
As technology is a cornerstone of any media wall, its seamless integration is paramount. This includes ample planning for power sockets, cable management systems, and the strategic placement of screens and speakers to enhance viewing and listening experiences. A well-executed technology integration strategy should include a flexibility allowance, such as creating larger openings for televisions to accommodate future upgrades. Furthermore, hidden installations like LED lighting strips under shelves not only provide necessary illumination but do so in an aesthetically pleasing manner that complements the overall media wall design.
Considering practical elements such as the stability of shelving by integrating additional studs and ensuring all electrical wiring is safely embedded or concealed are critical steps that combine safety with style, maintaining the clean lines and uncluttered aesthetics that are characteristic of effective DIY media wall aesthetics.
The paradigm of DIY media wall projects in modern homes continually evolves, blending functionality with bespoke style elements, standing at the intersection of innovation and personal expression.
DIY Media Wall Construction Techniques
Embarking on the DIY framework building for a bespoke media wall construction is both an exciting and ambitious project which can transform your living space. The crux of successfully creating this focal feature lies in paying careful attention to the step-by-step wall assembly, ensuring that each phase is executed with precision. Adhering to these methods not only enhances your home’s aesthetics but also contributes to healthier indoor air quality, especially when incorporating materials such as Purebond plywood, known for being formaldehyde-free.
Building the Framework: Tools and Materials Needed
Your toolkit for constructing a sturdy framework should include measuring tapes and levels, critical in setting up the vertical studs accurately. Discussing the popularity, 60% of DIY enthusiasts show a preference for wood over metal studwork, mainly due to its versatility and warmth in design. The use of an 18-gauge brad nailer proves indispensable in securing plywood, while a jigsaw is required for precision cuts in the trim pieces, specifically 3/4″x3/4″ notches. As you measure out cavities for recessed appliances, which 50% of homeowners desire for additional storage, use 3/4″ pocket holes, fastened with 1 1/4″ pocket screws to ensure robust assembly. Early stages of construction also involve electric considerations, with 90% of installations requiring dual power socket locations, as well as ensuring any visible cables are managed discreetly—something 80% of designs incorporate for a cleaner look.
Step-by-Step Guide to Constructing the Wall
Once the framework is set, the progression to wall assembly includes bracing the structure with horizontal supports to add rigidity. Brackets for electric appliances are then carefully installed, a task often requiring expert consultation; indeed, 70% of DIYers recommend getting a qualified electrician to carry out or verify this step. The prevailing trend for matte finishes is evident with 65% of homeowners selecting this option to reduce screen reflections. Finishing touches may involve aesthetic enhancements such as mood lighting, a choice made by 55% of builders, while others, about 45%, opt to integrate additional features like electric fireplaces to augment the entertainment experience. Achieving a professional finish may mean hiring professionals, which 30% of individuals do, for specific tasks such as plastering, thereby ensuring that your DIY media wall not only serves as a stylish focal point, as believed by 75% of homeowners, but also meets safety standards, with a final outcome boasting ample storage and a seamless design.


